|
 |
Tutorial 1: "Adding Outdoor Shadows Solution to rendering pipeline"
In this tutorial we will setup Outdoor Shadow Solution, then I'll show you how to add support for smart materials and how to change amount of split planes.
NOTE: During tutorial you will need to import several channel groups, some of them are provided with tutorial while
other can be found in "Outdoor Shadows Solution for Q3D" package. Just for clarity - I'll be using "v13 With Monster
and Nature Painter" package during tutorial. While you import channel groups from package, some public caller links
can be broken, mostly it's GUI links, that is used to disable/enable/switch certain features. During tutorial I'll show
you how you can fix them. This is made intentionally, so you would see where and how logic of features is
controlled.
We will start from simple rendering pipeline, with two simple objects and sky. Then step by step we will add render
of shadow maps, depth render, SSAO and Deferred shadows calculation and application of these effects to the
scene. You can use any sky model that you want, practically all what we need is a sun position.
1.
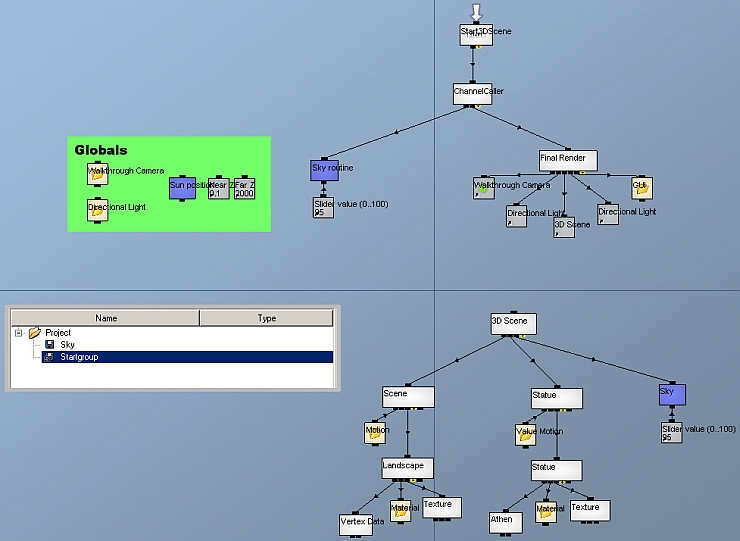
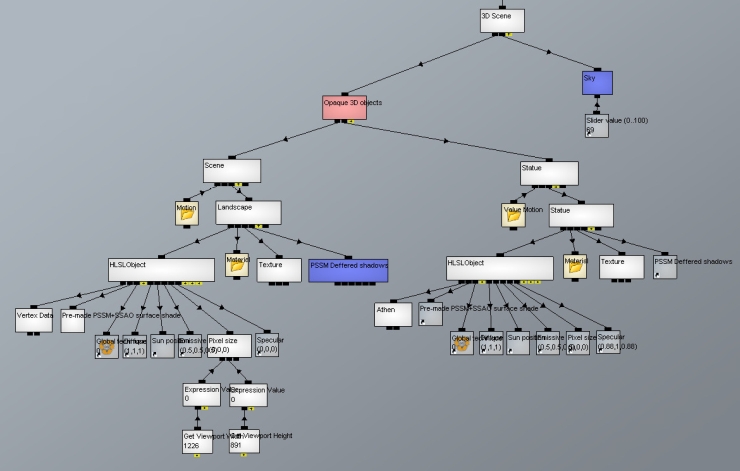
Open "\Start Scene\startgroup.cgr", you will see there a simple scene with Walkthrough camera, one direct light and two objects. This is how channel graph should look like:
And a 3d scene:
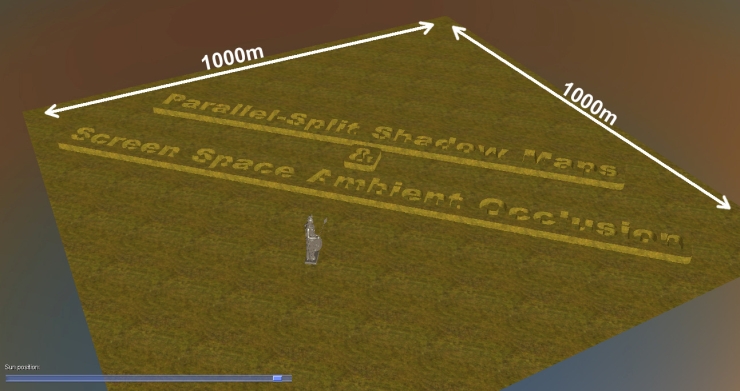
The size of the scene is 1000x1000 meters and height of statue is about 94 meters.
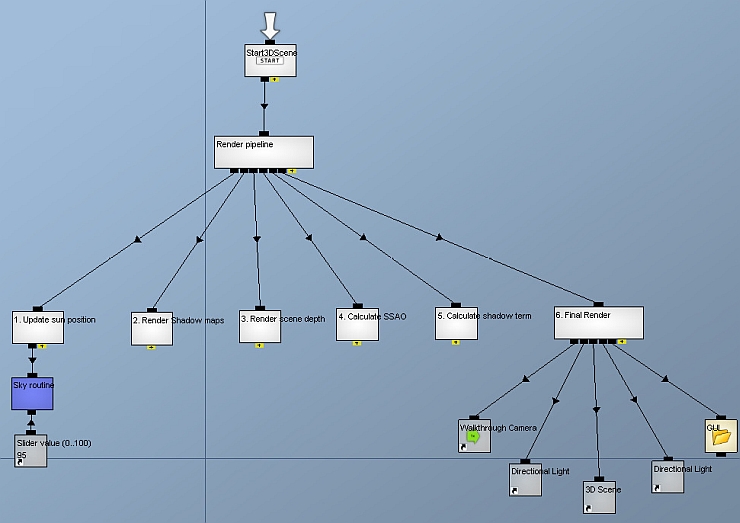
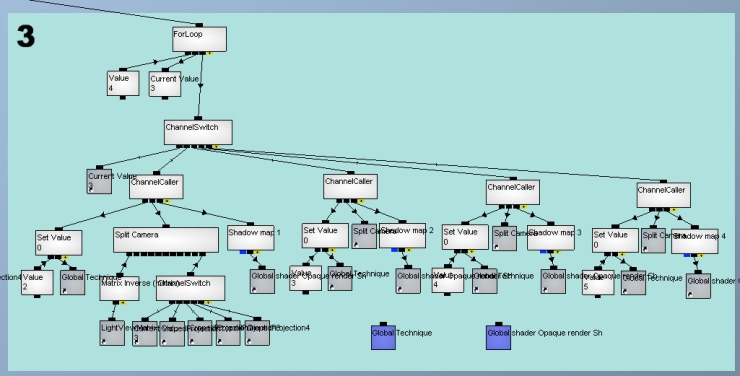
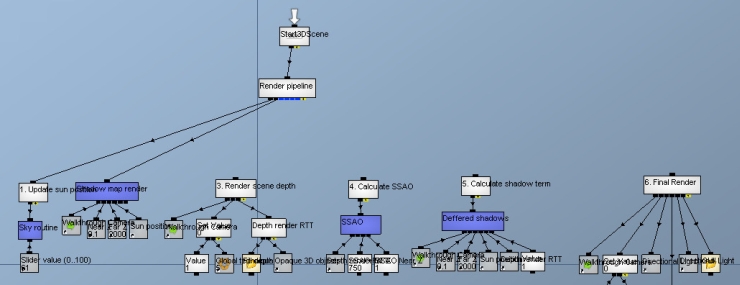
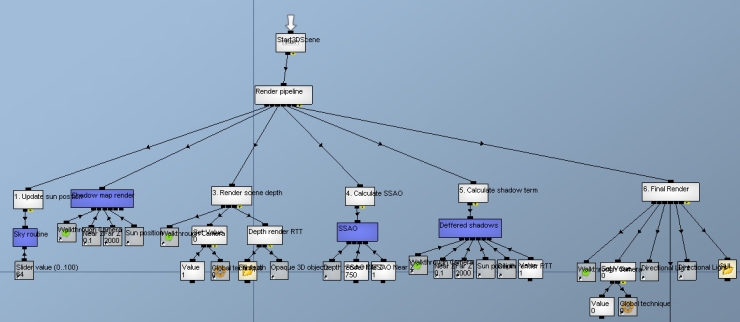
First we need to setup a "general" pipeline, simple channel callers that will be called every frame. The first one will
update Sun position, second one will render shadow maps, third one will render scene depth, fourth one will
calculate SSAO, fifth will calculate shadow term and blur it together with SSAO and sixth the final one will render
final image of the current frame.
2.
Create and name channel callers as shown on following channel graph:
3.
Render to shadow maps and scene depth is done using shaders. We will use one HLSL code for everything
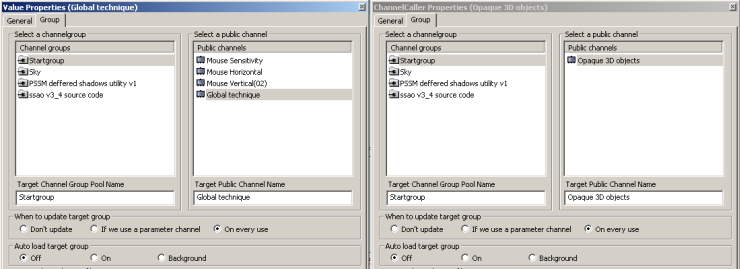
and will switch HLSL channel techniques to make render appropriative for current step. Create value
channel, make it public, name it "Global technique" and make it's Update "Continuous":

4.
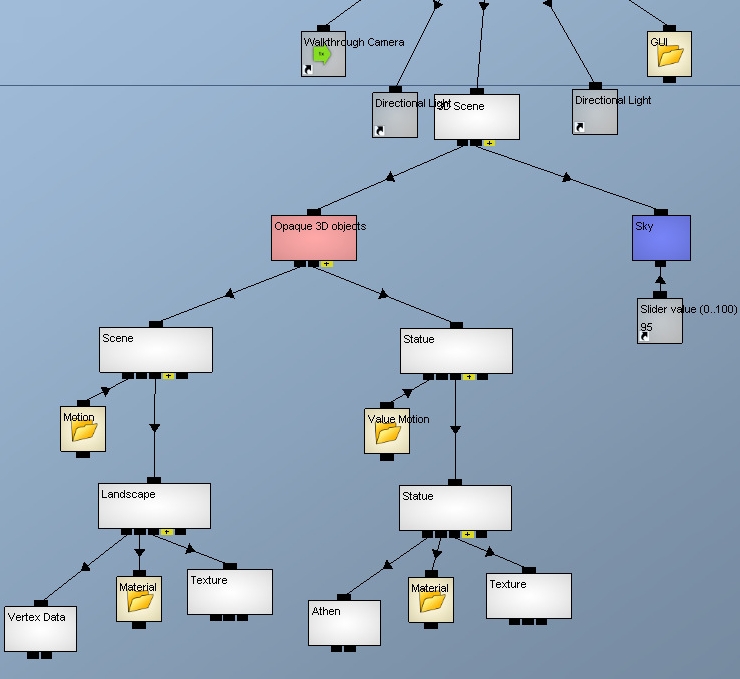
Now we need to separate Opaque objects, that will be rendered into depth and shadow maps, from
translucent objects and sky. Create new channel caller and name it "Opaque 3D objects", connect primitives
to it and make it public:
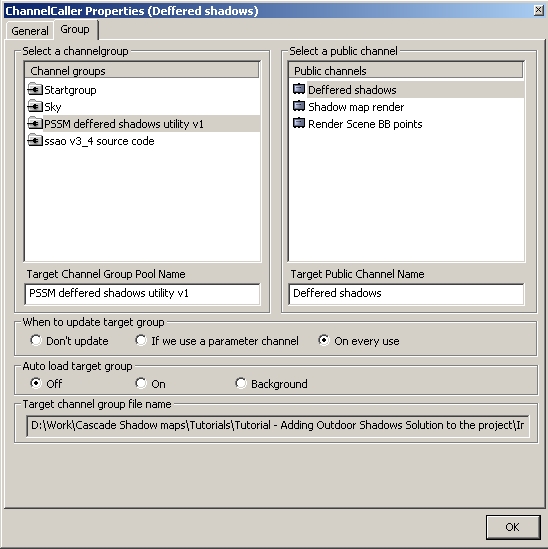
We are ready to setup render to shadow maps. Channel group ⌠PSSM deffered shadows utility v1.cgr■ consist of
two parts √ shadow maps render and shadow term calculation, right now we will work with a first part.
5.
Import "PSSM deffered shadows utility v1.cgr" into project (take it from "v13 With Monster and Nature
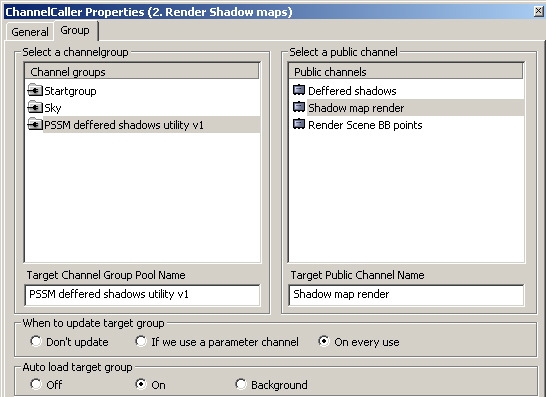
Painter" package). Save it somewhere in your project's folder. Now we will turn "2. Render Shadow maps"
channel caller into Public call channel with following linking:
6.
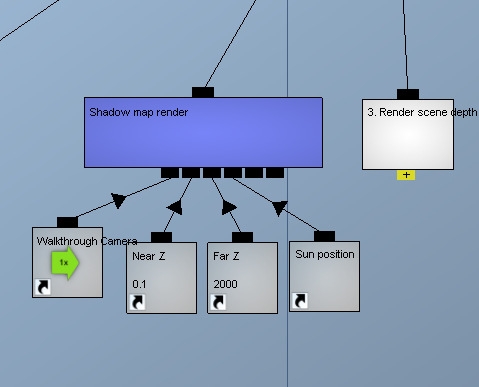
Now connect these variables to it:
NOTE: Right now, if you open "PSSM deffered shadows utility v1" you might get errors as not all channel groups are
imported, ignore it we will re-link all public call channel later. Now we will setup depth render.
7.
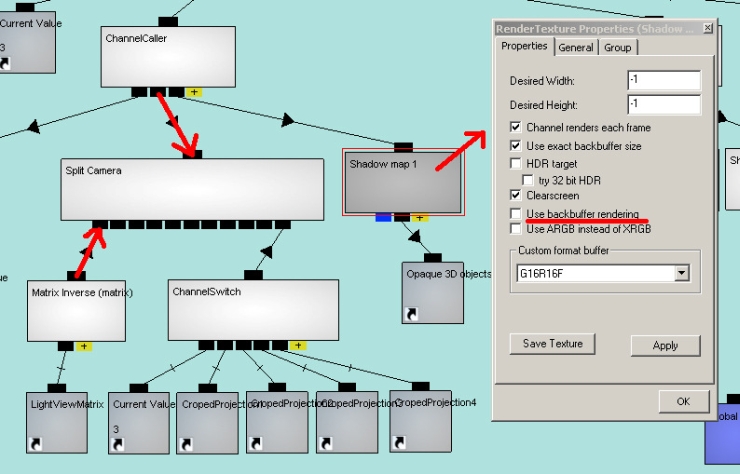
Create render to texture channel with following settings and name it "Depth render RTT":
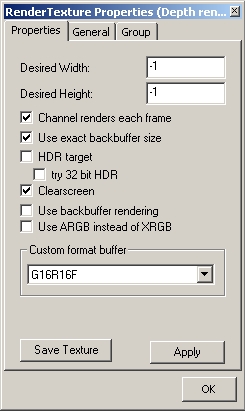
NOTE: Some video cards (as Quadro Fx series) don't support float point textures with only two channel, if that's a
case for you, than use A16B16G16R16F as a custom format. With port to Quest3D 4.3, these formats will be replaced
by better and widely supported "hardware shadow maps" format.
8.
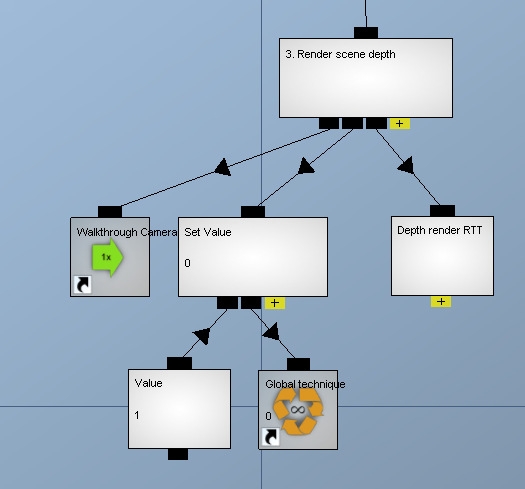
Connect it and create channel logic as shown here:
9.
Before we connected 3d objects that will be rendered into depth texture, we need to ensure that initially
depth buffer contains very large depth values. For this we will use a pixel perfect quad with a very simple
shader. Copy/paste "Fill depth" 3d object from "\Additional channel groups\fill depth.cgr" and connect it as
a first child of "Depth render RTT" render to texture channel. Connect "Opaque 3D objects" channel caller
next to it:
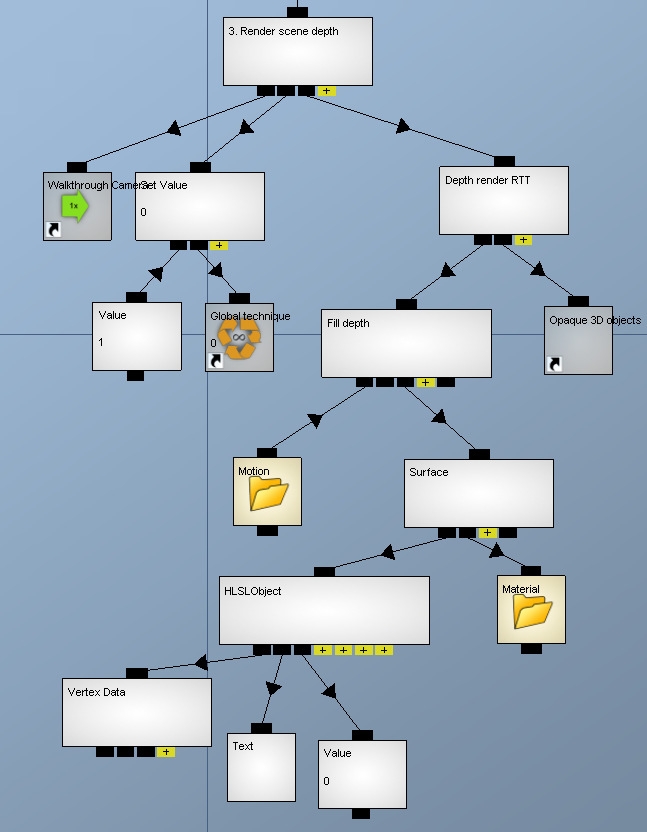
Now depth render is ready, we set "Global technique" value here to one as this technique number will be used in
shaders to render depth. Next step is to setup SSAO calculation.
10.
Import "ssao v3_4 source code.cgr" channel group into your project (take it from "v13 With Monster and
Nature Painter" package). Create channel caller and make it Public caller with following linking:
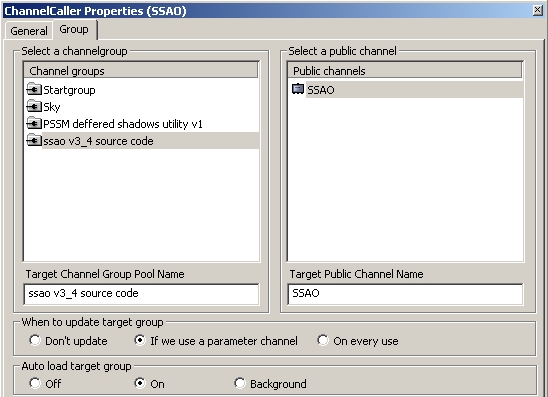
NOTE: During import you can get an error, you can safely ignore it. We will fix public callers later.
11.
Connect it to "4. Calculate SSAO" channel caller and make following channel logic:
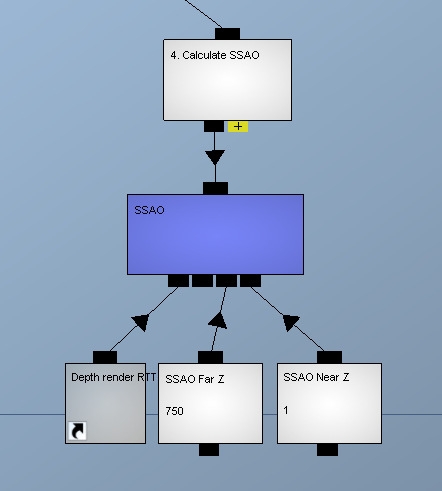
Now we will setup Shadow term calculation.
12.
Create channel caller and make Public caller with following linking:
13.
Create channel caller and make Public caller with following linking:
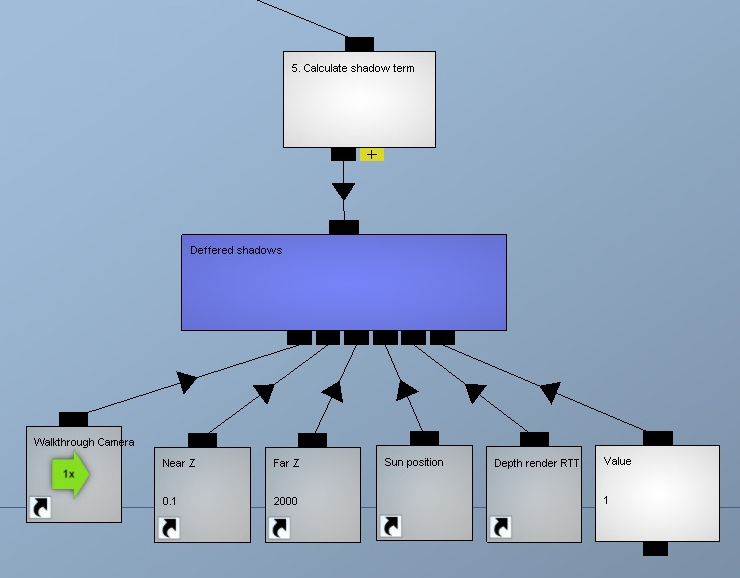
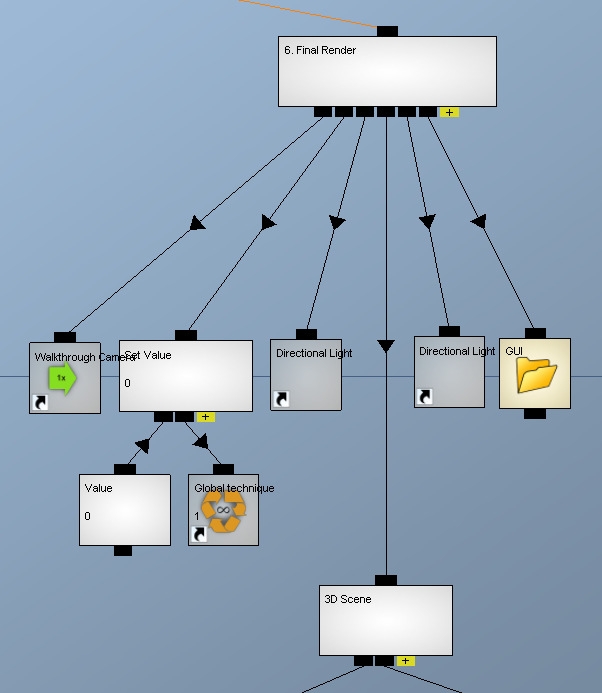
14.
Final addition to the last six stage of pipeline. Create Set Value channel and connect it like shown here, this is
done to switch shaders technique to render final image:
It's time to add shaders and see how everything works. To be sure that everything works ok, first we will use premade
shaders that for sure will work in a pipeline. Later I'll show you how you can change arbitrary shader to
support shadows.
15.
Copy/paste HLSL and all other channels from "\Additional channel groups\pre-made pssm+ssao surface shader.cgr" and connect them as shown here:
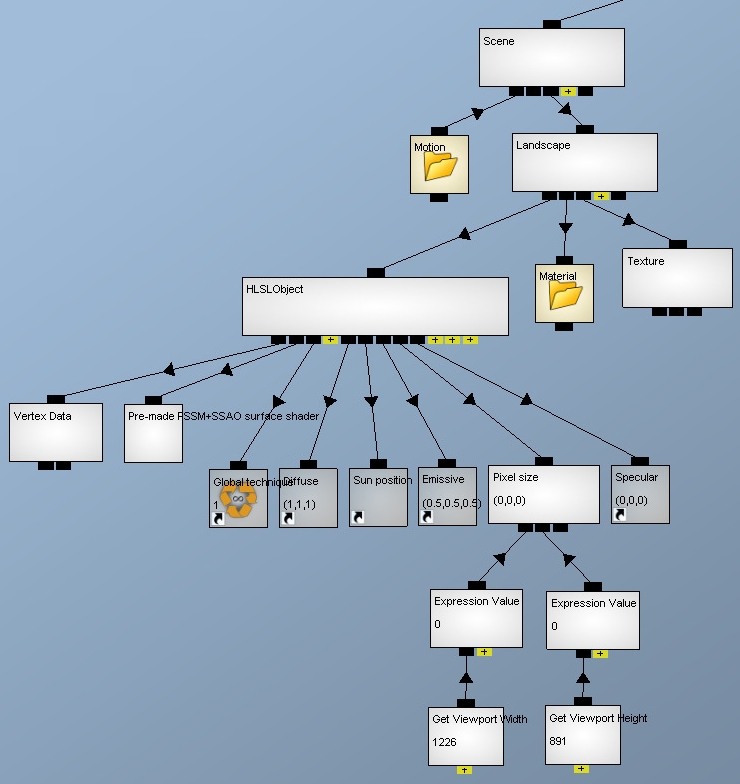
NOTE: Diffuse, emissive and specular are shortcuts from surface's material folder.
Now we can connect texture that will contain calculated shadow term.
16.
To do this, create a texture channel and make it Public caller with following linking:
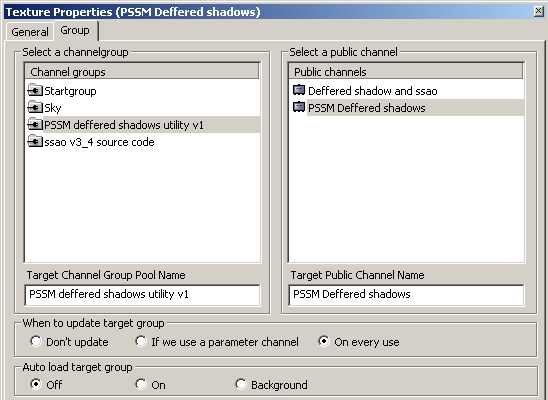
NOTE: Such way you will use a blurred version of shadows and SSAO, ⌠Deffered shadow and ssao■ is the same
texture before blurring, sorry for giving them inconvenient naming.
17.
Now connect this texture to the surface of the 3d object and set the same shader to statue, so final channel graph would look like this:
Now we will restore all Public callers links in imported channel groups. Let's start from shadow calculation channel
group.
18.
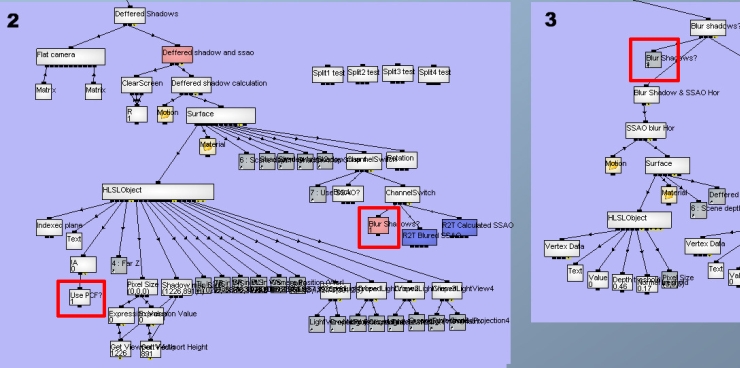
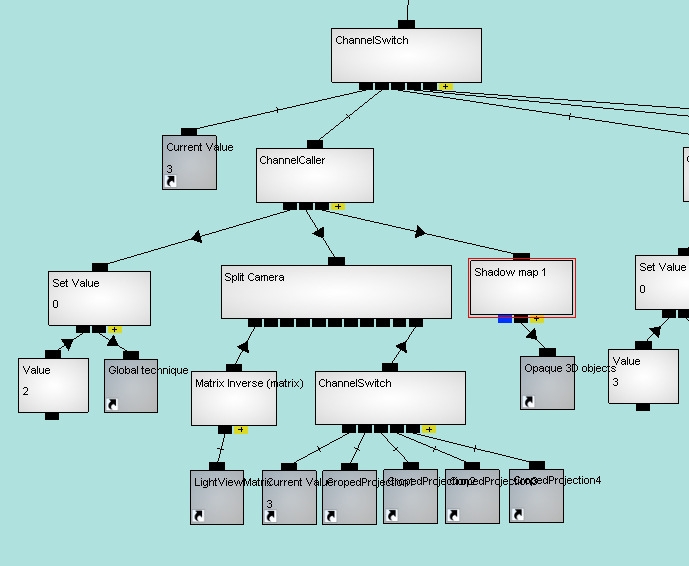
Open "PSSM deffered shadows utility v1" channel group and locate this place, it's on the right side of channel graph:
19.
We need to fix these two Public call channels, set their linking as show here:
20.
Locate this part of channel graph, it's on the right side:
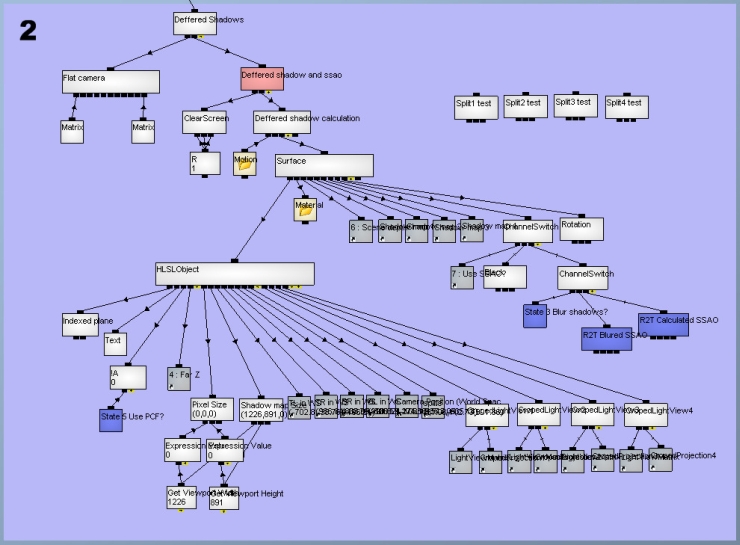
21.
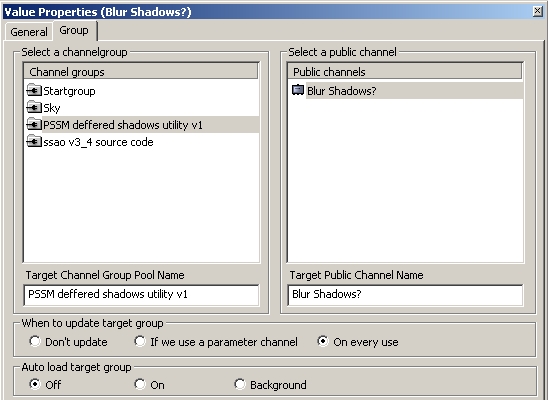
Replace "State 5 Use PCF?" and "State 3 Blur shadows?" with simple value channels set to 1, rename them to
"Use PCF?" and "Blur shadows?", make "Blur shadows?" public and connect it's shortcut to the IF channel
on the right (area number 3, it's not seen on previous screenshot, channel is called Blur Shadows?):
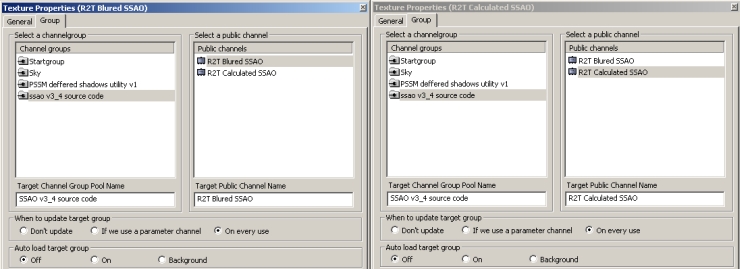
Last two Public callers that need to be fixed here is "R2T Blurred SSAO" and "R2T Calculated SSAO", first one
represent a texture with blurred SSAO, second one is SSAO before blurring. The reason why it's done this way is
simple - SSAO always need to be blurred, so in case when shadows are not blurred SSAO will be blurred separately
in its own channel group and result will be added to "Deffered shadow and ssao" render to texture channel. If
shadows are blurred than not-blurred version of SSAO would be added to "Deffered shadow and ssao" render to
texture channel and blurred together with Shadow term.
22.
Check that is "R2T Blurred SSAO" and "R2T Calculated SSAO" Public callers are linked this way:
Now let's fix Public caller in SSAO channel group.
23.
Open "ssao v3_4 source code" channel group, you will see a Public caller "State 3 Blur Shadows?", set its
linking this way, so it would read a value from channel group that we just fixed:
Let's fix shadows now. The reason why it's not displayed correctly right now is because shadow system
doesn't have a clue about geometric properties of your scene, algorithm needs your help here. First we will ensure
that all scene is visible from sun's point of view, than we will provide algorithm with a bounding box of the whole
scene.
24.
Unlink all channel callers of the pipeline except "2. Shadow map render":
25.
Open "PSSM deffered shadows utility v1" channel group and locate this channel logic:
It's a part of channel logic routine #3, on the right side of the channel group.
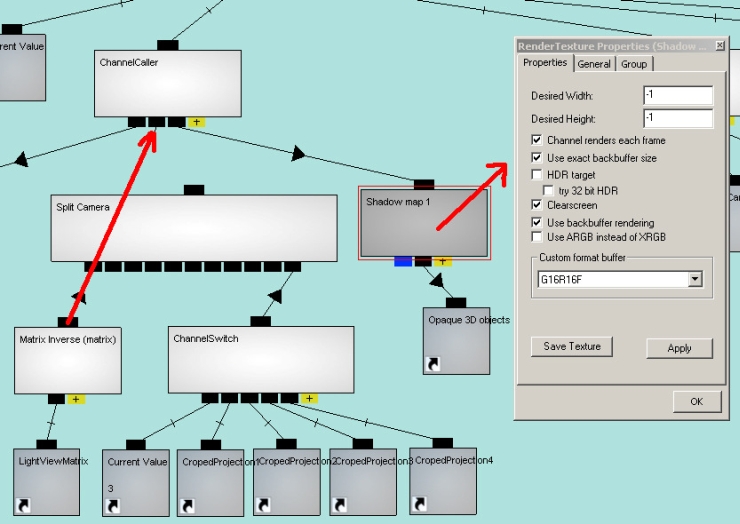
26.
Connect "Matrix Inverse (matrix)" directly to "Channel caller" instead of "Split camera", this way first shadow
map will contain all the scene instead of the only first shadow map split. Check "Use back buffer rendering"
in "Shadow map 1" render to texture channel:
Now switch to preview mode and you should see something like this:
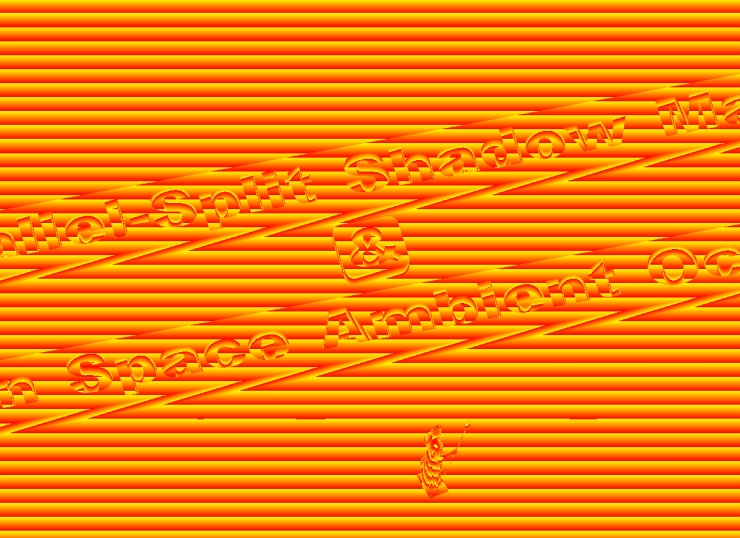
Your perspective can be different as shadow map camera depends on position of sun.
Now we need to ensure that scene is completely fit into the camera, this is simple to do, we just need to change a
sun camera distance from the center of the scene.
27.
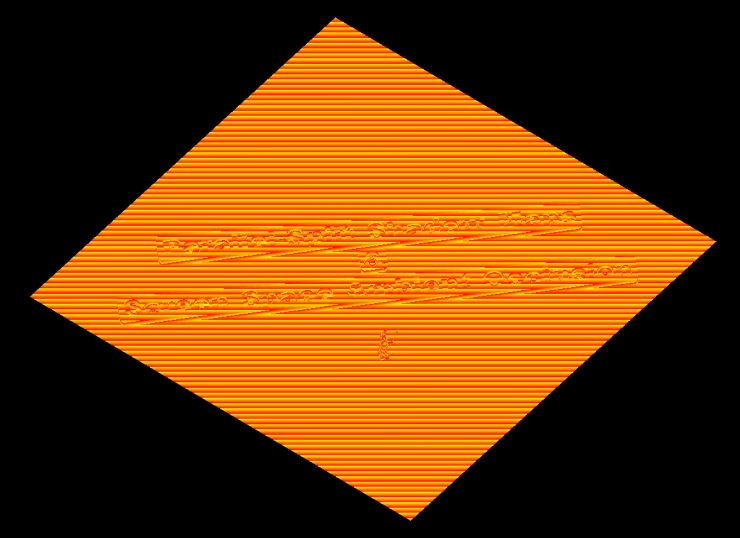
Locate highlighted value channel and set its value to 2500:

Now scene completely fits into sun camera's view:
NOTE: In your own projects, check that scene fits camera with different positions of sun. For example, it can fit
during mid day but not capture whole scene on a sunrise
Now we will setup a bounding box of the scene. But before make sure that you reverted all links back to normal. This
is what you need to check:
And reconnect channel callers of rendering pipeline:
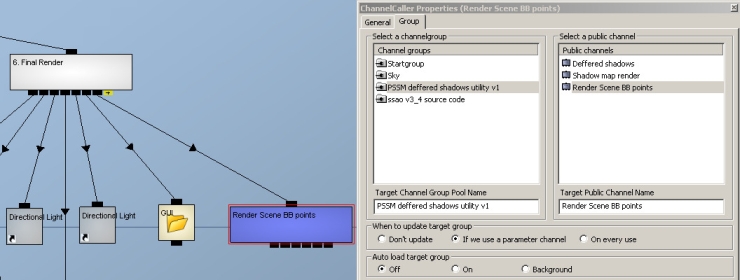
28.
To set bounding box, create a channel caller and make it Public caller with following linking, connect it at the end of the "6. Final render" channel caller:
29.
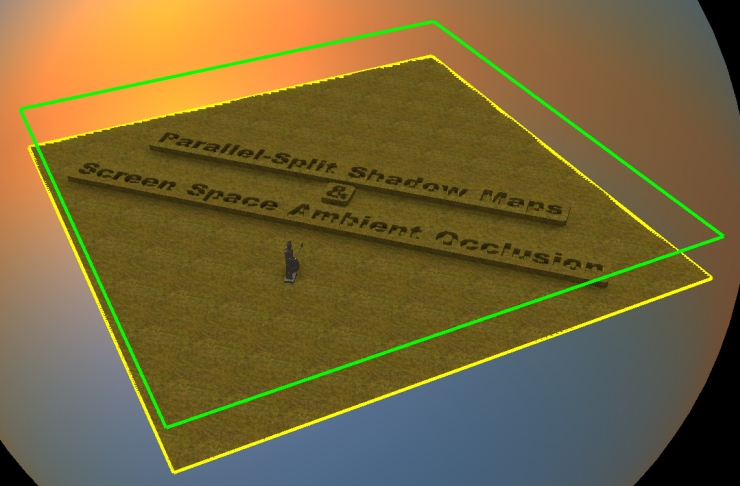
Go to animation section and locate 3D object with name starting at "Top.." and "Bot..", there are eight of
them, each one represent one corner of the bounding box. Their position are interdependent, so you will
need to manipulate only few of them. Move them in the scene in such a way that they form a box that
tightly covers whole scene:
That's all, you can switch off render of bounding box now. Pipeline is set. One thing that we didn't discussed yet is a
translucent objects such as glass. If it's not important to apply shadows to such objects you can simply render them
at the end as you would regularly do (as it's done in example right now). If indeed, you want to have shadows on
them as well, please contact me and I'll provide you with example, it's a matter of adding one more step into your
rendering pipeline and making special shader for such objects. Now we will begin next tutorial and learn how to deal
with precision issue, that is always follows shadow mapping algorithms.
|
|
|
|
|
|